Rsync options: setting Rsync options
- Accessing the Rsync options
- Specifying the path structure for copied files
- Keep deleted files
- Extra rsync options
- Extra ssh options
- Retry options
- Cygwin version
- Data transfer limits
- Optimize for local network use
- Set permissions on the backup
- Media usage report
- Logging
- Encryption
- NTFS metadata
- Preserve hard links
- Incremental recursion
Accessing the Rsync options
To access the Rsync options window shown above:
- Click
 Jobs in the navigation bar.
 - Select the job to be edited and click
 Edit at the bottom of the window.
 - Click
 Rsync options on the left menu.
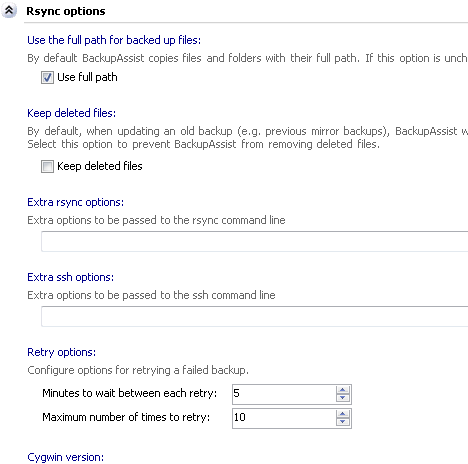
With Use full path for backed up files on (default setting) BackupAssist will copy files and folders to your backup device and maintain their full path and folder structure. With Use full path off BackupAssist will copy files using only the common root directory of your file selections. We recommend leaving Use full path on as this captures the full path of backed up files, making restoration easier.
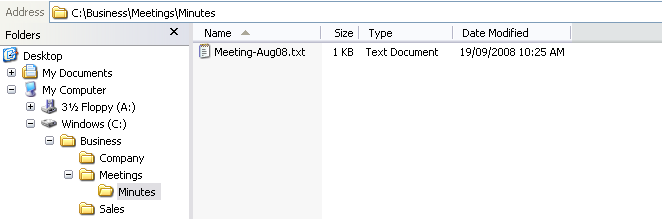
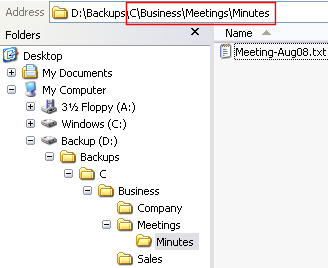
An example of how this option works in both cases has been illustrated below:
 |
|
| Folder selected for backup: C:\Business | |
 |
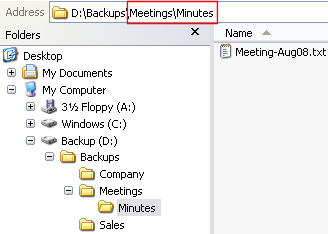 Backed up files: with "Use full path" OFF |
| Backed up files: with "Use full path" ON | |
To turn Use full path on or off:
- Under the heading Use full path for backed up files check Use full path to turn this option on. Uncheck Use full path to turn it off.
- Use full path is enabled by default and is the recommended setting.
By default each time an Rsync backup runs BackupAssist will make sure that the files residing on the Rsync server are an exact mirror of those selected for backup. This means that if files are deleted from the source location, and are therefore not included in the next backup, BackupAssist will remove these same files from the Rsync backup destination to make sure that it is an exact mirror of the source files. If you want to change this behaviour, and retain these deleted files on the Rsync backup destination:
- Check Keep deleted files to retain files already residing on the backup server that are not contained in the selections for the most recent backup run. This will mean that the latest set of backed up files will be merged into the existing set of files residing on the Rsync backup destination. Any file with the same name already present on the Rsync backup destination will be overwritten with the most recent source file.
You can easily add any additional commands you would like Rsync to execute during the backup process. This feature should only be used by advanced users familiar with Rsync commands. For a full list of commands available to Rsync, consult the Rsync help documentation.
- Input any additional command line parameters directly in the available field.
You can easily add any additional commands you would like ssh to execute during the backup process. This feature should only be used by advanced users familiar with ssh commands. For a full list of commands available to ssh, consult the ssh help documentation.
- Input any additional command line parameters directly in the available field.
- Use the up-arrow or down-arrow to the right of the Minutes to wait between each retry label to increase or decrease the number of minutes BackupAssist should wait between attempts to connect to your Rsync backup server. The maximum allowed value is 1440 minutes (24 hours).
- Use the up-arrow or down-arrow to the right of the Minutes to wait between each retry label to increase or decrease the number of times BackupAssist should retry the connection to your Rsync backup server. The maximum allowed value is 100 tries.

Before you can use Rsync on a Windows Workstation or Windows Server, you need to download and install the Cygwin system. Here you can specify what version of Cygwin you installed on your Rsync server so that Rsync knows what libraries to use when backing up to your server.
- Use the available drop-down menu to select the appropriate version of Cygwin that has been installed on your Rsync server.
Depending on the amount of other network traffic being processed at the time when your backup job is scheduled to run, you may want to limit the transfer rate of the Rsync backup. This will mean that your backup job will be slower as it is not using all of the bandwidth available on the network. If no other network intensive processes are scheduled to run at the same time as your backup job, we recommend that you do not limit the transfer rate. You can also limit the total amount of data that can be transferred during each backup; this setting is useful if you are paying for storage on a per megabyte or per gigabyte basis and want to make sure the backup does not run over budget.
- Check Limit maximum transfer rate and then set the maximum transfer rate in KB/second using the available control.
- Check Limit maximum data transfer and then set the maximum size you want to allow for your backup in gigabytes..
Optimize for local network use
Select this option to optimize the transfer for CPU usage on the client and server, rather than for bandwidth. Compression will be turned off and the rsync algorithm will not be used (i.e. if a file has change, the while file will be transferred rather than just the differences). This is useful for backups over a fast local network where minimizing CPU and disk usage is more important than minimizing network usage.
- Check Optimize for local network use to enable CPU optmization.
Here you can determine what permissions to grant to users on the backup destination located on the server where Rsync is installed. By default, the Rsync user you have in set in the Rsync Server Options window has both read and write permissions to the backup destination. You may, however, want to allow other users on the Rsync server to be able to view files located in the backup destination, as well as be able to modify existing files or write new files to the backup destination.
![]() Configuring Rsync Server options
Configuring Rsync Server options
- Check Grant all users read access to the backup to allow other users to view files located in the backup destination.
- Check Grant all users write access to the backup to allow other users to modify files located in the backup destination or write new files to the backup destination.
- Note: write access does not imply read access. To grant both read and write access to files located in the backup destination for all users you need to check both options.
This option is enabled by default. The media usage report is part of the overall backup report generated for each backup. It outlines how much disk space has been used by backups on the Rsync server, including a list of each backup set and its size, and an indication of how much disk space has been saved by the use of Single Instance Store.
- This option will not work if your job is configured to connect to an Rsync daemon.
 Learn more about Rsync connection types
- Check Enable media usage report to have the media usage report for your Rsync server included in your overall backup report.
With detailed logging enabled BackupAssist will include a record of every single file that was backed up within the backup report generated after each backup completes. This can be useful for troubleshooting purposes in case where the Rsync job is backing up more or less files than expected.
- Note: we do not recommend this setting for general users, as it can potentially create very large backup reports that will take up considerable hard disk space.
- Check Enable detailed logging to have details of every file backed up included in the Rsync backup report.
With encryption enabled data stored on the Rsync server backup destination will be automatically compressed and encrypted with AES-256 bit encryption. This reduces the amount of disk space used on your Rsync host, and means that your data safe is “in the cloud”, making external hosting a safe and secure option. File names are also obfuscated on the Rsync server, which means that anyone looking at the data on the Rsync data host cannot determine what the data is, nor read its contents.
To enable encryption for your Rsync job:
- Check Encrypt the backup and enter your password and confirm it in the available fields.
- Note: if you enable or disable encryption for your Rsync job, BackupAssist will need to "re-seed" your backup to the Rsync backup destination with a full set of data (i.e. the next backup will be a full backup regardless of how many files have changed).
With the NTFS metadata option enabled, NTFS streams, such as alternate data streams and security data will be saved to a separate file on the Rsync backup destination and then added back to the file as part of the restore process when using the BackupAssist Restore Console. So while these attributes are not "preserved" on the files backed up to your Rsync destination, they will still be restored.
The table below outlines what file system attributes are preserved at the backup destination when the NTFS metadata option is enabled:
| File attributes at backup destination | Preserved? |
|---|---|
| Windows File Attributes | |
| Creation time | |
| Last access time | |
| Last modified time | |
| NTFS security (ACLs) | |
| NTFS alternate data streams (ADSs) |
- Check Back up NTFS metadata to have BackupAssist save NTFS metadata to a separate file on the Rsync server.
This option is enabled by default and should only be disabled if requested by the BackupAssist Technical Support team.
With the Preserve hard links option enabled, Rsync will keep a track of hard linked files on the source location (where files have been selected for back up) and reproduce these hard links on the backup destination. For example: if two files on the source location are hard linked, they will be hard linked on the backup destination as well. If Preserve hard links is disabled, the hard linked file will be transferred twice, resulting in two completely separate copies of the file being stored on the backup destination.
Hard links are not particularly common on Windows systems, but there are two situations where they are used:
- You have selected the System State for backup. Many files in C:\Windows that are part of the System State have multiple hard links.
- If you are using an Rsync backup job as a secondary backup of another Rsync or File Replication backup that has Single Instance Store enabled.
Read more about Single Instance Store
In both cases you should aim to preserve hard links, which is why this option is enabled by default. The Rsync manual does claim that this option can reduce the speed of a backup, but testing has not revealed a noticeable difference in performance.
This option is enabled by default and should only be disabled if requested by the BackupAssist Technical Support team.
In older versions of Rsync (pre 3.0.0), Rsync would begin the backup by first generating a list of files to be transferred before commencing any actual transfer of data. If the file list was large it meant that considerable time might elapse before Rsync commenced the transfer of any files. If a backup was interrupted during the creation of the file list and had to be restarted, the entire file list would need to be re-created and no data transfer would have occurred.
As of Rsync 3.0.0, Rsync introduced an "incremental recursion" feature, which results in the file list being created at the same time as the the transfer of data. This means that if the backup needs to be restarted, the overall backup will not take as long to complete because at least some data transfer would have already commenced.