BackupAssist CryptoSafeGuard
CryptoSafeGuard is a cyber-resilience feature designed to protect backups from ransomware attack and prevent ransomware-encrypted files from being backed up. CryptoSafeGuard is available for BackupAssist 10.1 (or newer) clients with valid BackupCare.
What is ransomware?
Ransomware is malware that encrypts files and demands payment to provide the decryption key so you can access those files again. Ransomware can spread across connected machines and can disable them completely, so infected machines will often need to be recovered from a backup. It is therefore important that your backups are not infected, which is why CryptoSafeGuard is such an invaluable feature.
What does CryptoSafeGuard do?
To protect your systems against ransomware attacks, it’s critical that you have reliable backups so you can restore data or recover your entire system. However, when ransomware attacks your systems, it can also infect your backups, leaving them unusable. CryptoSafeGuard protects your backups from ransomware using two important features: the CryptoSafeGuard Detector and the CryptoSafeGuard Shield.
CryptoSafeGuard Detector - prevents infected files from being backed up
When a backup job starts, BackupAssist scans the data being backed up. If there is any sign of a possible ransomware infection, all backup jobs will be blocked from running, and SMS alerts will be sent if configured. If your job backs up Hyper-V guests, the CryptoSafeGuard Detector will also scan the contents of those Hyper-V guests in one pass.
This scan errs on the side of caution so it may flag files as possibly infected, when they are not infected. If this happens, you will be able to whitelist these files so that BackupAssist knows they are safe, and will not flag them again.
Note: CryptoSafeGuard detects signs of a ransomware infection. It does not protect the actual system from ransomware, or remove ransomware.
CryptoSafeGuard Shield - protects your existing backups from ransomware
CryptoSafeGuard Shield prevents unauthorized processes from creating, deleting or updating data in your backups or CryptoSafeGuard's configuration files. This feature runs automatically in the background when CryptoSafeGuard is enabled.
Note: CryptoSafeGuard Shield will prevent you from manually deleting backups. If you need to manually delete backups, disable CryptoSafeGuard, make the deletion, and then re-enable CryptoSafeGuard again.
CryptoSafeGuard overview
The first time you run a job with CryptoSafeGuard enabled, it will scan files modified in the last 3 months. This scan may take some time depending on the amount of data being backed up. Subsequent scans will be incremental and a lot faster, with minimal impact on the jobs’ run times. When you start using CryptoSafeGuard there will be a per-job grace period, and if a job detects possible ransomware, a warning will be displayed but the backup jobs will not be blocked. The grace period for a job lasts until the job has 3 consecutive clean scans. Grace period warnings will display a yellow banner in the BackupAssist UI.
After the grace period, the banner will be red and indicate that all backup jobs have been blocked from running. Clicking on the banner opens a dialog that can be used to confirm an infection by selecting Yes or No. If you select No, the dialog will allow you to whitelist the suspicious files. The current whitelist can be opened from both the Backup home page and the Settings tab, and allows you to review and edit the existing whitelist.
Enabling CryptoSafeGuard
CryptoSafeGuard is available for all BackupAssist users who have BackupAssist 10.1 or later and an active BackupCare subscription. Not sure if your BackupCare has expired? Find out here. If you’ve updated your BackupCare subscription, your installation of BackupAssist will need to be online so the licensing server can tell your BackupAssist installation to make CryptoSafeGuard available.
Once CryptoSafeGuard is available in BackupAssist, you should check that you have CryptoSafeGuard enabled by following the steps outlined in this section. If your backup jobs are currently blocked due to a potential ransomware infection, they will be unblocked if CryptoSafeGuard is disabled.
To enable or disable CryptoSafeGuard:
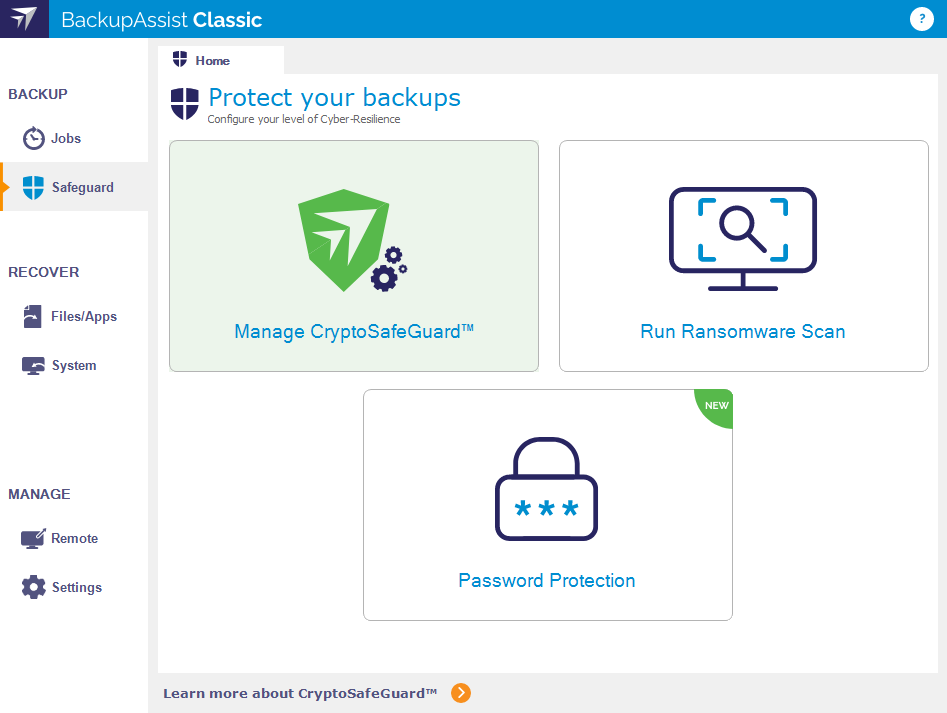
- Select BackupAssist’s Safeguard tab.
- Select Manage CryptoSafeGuard.
- Ticking this box beside Enable CryptoSafeGuard protection will enable CryptoSafeGuard. Removing the tick from the box will disable CryptoSafeGuard.
Remember, this setting applies to all backup jobs.
Note: When your backup destination is a NAS or network share, it should be secured using best practice data security. This means only machines running BackupAssist and CryptoSafeGuard should have access to the folders that the backups are in, and those folders should only allow access to the Backup User Identity.
CryptoSafeGuard's Grace Period
CryptoSafeGuard has a grace period, within which a job's failed scan will display a warning banner, instead of blocking all jobs. This grace period provides time to review any failed scans and whitelist any false positives. After 3 consecutive safe scans, the grace period for that job will end and any failed scans will result in a red warning banner and all jobs will be blocked.
Grace period points
The following points clarify how the grace period works across backup jobs:
- If there are 1 or 2 safe scans and then 1 failed scan during the grace period, an additional 3 consecutive safe scans will be required before the grace period for that job ends.
- If a job is within its grace period, any ransomware detections during the running of that job will not result in jobs being blocked.
- If a job is out of its grace period and it detects ransomware, all jobs will be blocked.
- If the yellow banner is current displayed, and a job that is out of its grace period runs, the yellow banner will be converted to a red banner and jobs will be blocked.
- If a job’s selections change, the grace period for that job is reinstated, but other jobs which are out of their grace period will remain out of their grace period (and will block jobs if they detect ransomware).
Grace period notifications
SMS notifications are sent when transitioning between banner / alert states:
- Unblocked (no banner) => Warning (yellow banner)
- Unblocked (no banner) => Blocked (red banner)
- Warning (yellow banner) => Blocked (red banner)
Since the yellow banner does not block jobs, any jobs that run during this state do not send an SMS, unless a job outside of its grace period detects ransomware, causing the yellow banner to be upgraded to a red banner (and an SMS to be sent).
CryptoSafeGuard notifications
When a backup job’s CryptoSafeGuard scan believes there may be ransomware, an alert will show next to the job in the Monitor UI and a red banner will appear at the top of BackupAssist’s UI. If you have configured email and SMS notifications, an email and SMS alert will also be sent.
Banner notification
You must click BackupAssist’s alert banner and follow the dialogs to respond to a possible ransomware infection. The banner includes a help link to the CryptoSafeGuard documentation. The banner is yellow during the grace period and red after the grace period has ended.
Email notifications
If you have set up the Email server settings and Email address list, and enabled Notifications in the backup job, a backup report will be sent with a BA8000, BA8001 or BA8002 error message to inform you of the possible ransomware detection.
SMS notifications
If you set up SMS notifications, SMS alerts will be sent when CryptoSafeGuard detects a possible ransomware infection.
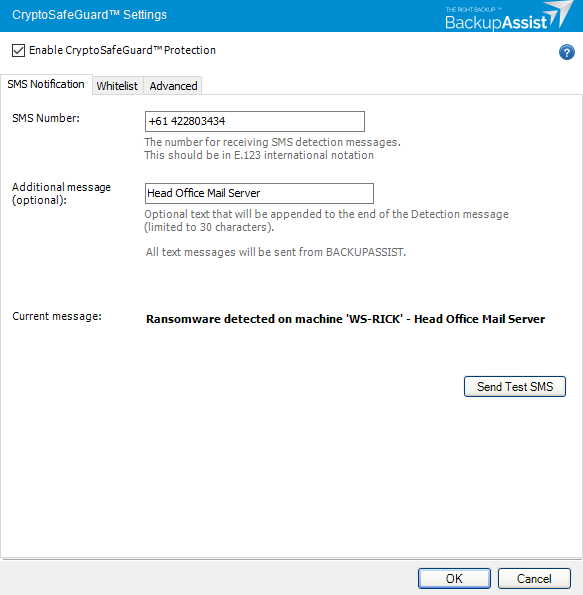
To set up notifications, select BackupAssist’s Settings tab, click CryptoSafeGuard and update the SMS Notification tab.
SMS Number
To set up SMS notifications, simply enter the phone number that is to receive the notifications into this field using the standard international phone number format +<country code><mobile phone number>.
Additional message
Use this optional field to enter an identifier or description for this machine. This is especially useful if you manage a lot of servers and need to know exactly what server the message came from.
Send Test SMS
The Send Test SMS button will become active once a phone number has been entered in the correct format. Click Send Test SMS and a test message will be sent to that phone.
CryptoSafeGuard uses a third-party provider for SMS notifications. Click these links to view the provider's Privacy and Security information.
Responding to a CryptoSafeGuard alert
When a possible ransomware infection is detected, all backup jobs will be blocked from running until the CryptoSafeGuard alert has been resolved. If you do not have a ransomware infection, BackupAssist will allow your IT systems administrator to review the detected files and whitelist them if they are safe.
To respond to a CryptoSafeGuard alert:
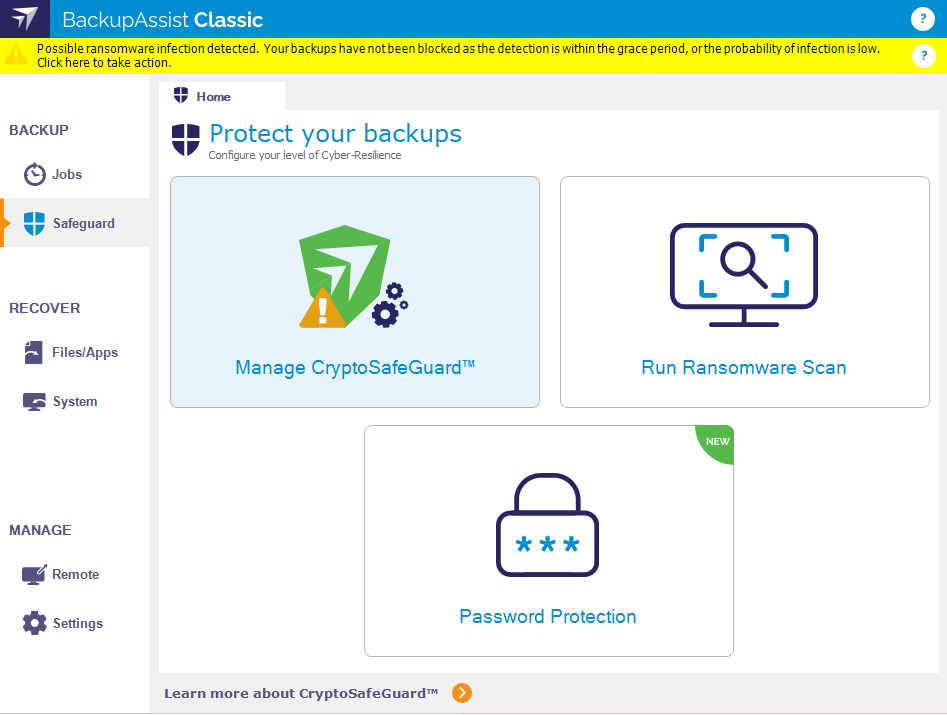
Step 1 - Click on the CryptoSafeGuard banner.
In this screenshot, the banner is yellow because the detection occurred during the grace period. Clicking on the banner will open the CryptoSafeGuard user interface.
Step 2 - Determine if there is a ransomware infection
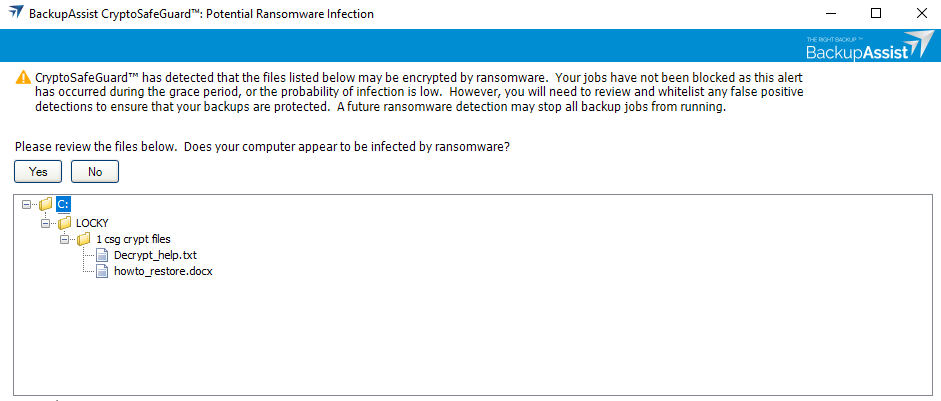
To help determine if there is an infection, the UI shows all file(s) that CryptoSafeGuard detected as potentially infected, so they can be reviewed. Right-clicking a file allows you to open the folder the file is in. Right-clicking a folder allows you to open the folder in Windows.
Deciding if your system is infected by ransomware will involve checks outside the scope of BackupAssist. In most cases, the first indication of a ransomware infection is a persistent ransomware message on your screen. If CryptoSafeGuard is the only indicator of an infection, your IT systems administrator's will review the suspected files. This review should include using anti-malware software and trying to open the listed files in their relevant applications to see if they still work.
Note: It is worth noting that the first time you run CryptoSafeGuard, it is possible that safe files will be flagged and need to be whitelisted.
Step 3 - Select Yes or No.
Your IT systems administrator will determine if you have a ransomware infection or not, and respond accordingly by selecting the Yes (have an infection) or No (no infection) button.
If you select Yes
You have a ransomware infection.
A dialog will open and advise that all backup jobs have been blocked and will not run until the infection has been resolved. If the IT systems administrator determines that your system has a genuine ransomware infection, you may need to perform a bare-metal recovery from your last successful backup.
If you resolve the ransomware infection without a recovery, the alert banner will still appear in BackupAssist.
To remove the banner and unblock jobs:
- Click on the banner
- Answer No (I’m not infected).
- Click Unblock jobs.
If you select No
You need to whitelist or delete the detected files.
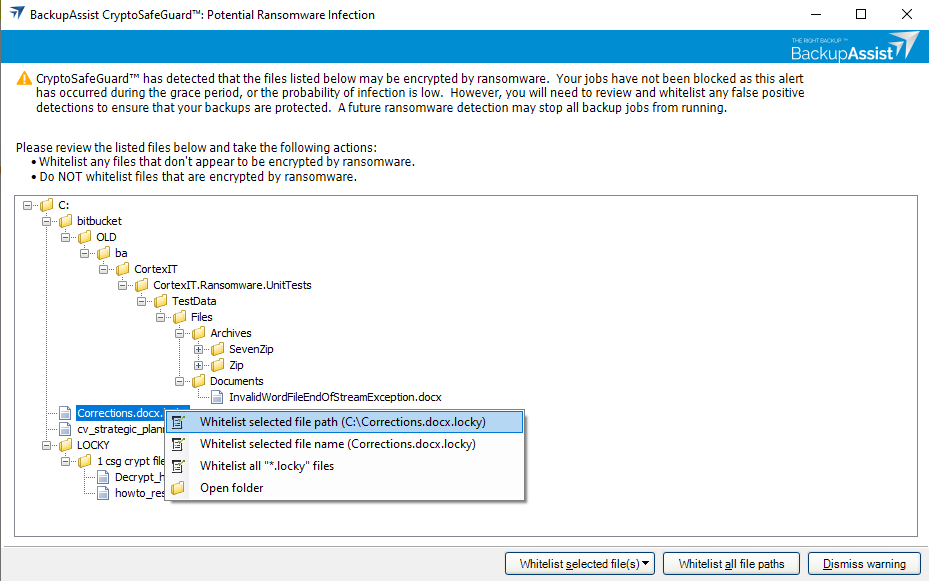
If there is no infection, select No. A dialog will advise that you need to remove or whitelist the detected files. To help you do this, new options and buttons will appear in the CryptoSafeGuard UI.The backup job that was stopped by CryptoSafeGuard will not automatically rerun. You can manually run the job or allow it to run at its next scheduled run-time.
The following actions can be taken with the detected file(s).
Whitelist selected file(s), paths or extensions
You can right-click each file and take one of the available actions, or select the file and click Whitelist selected files and take one of the available actions.
The available actions are:
- Whitelist selected file path <file path> - This option will whitelist the displayed file path.
- Whitelist selected file name <file name> - This option will whitelist any file with this name.
- Whitelist all <file extension> files - This option will whitelist all files with the file extension shown.
- Whitelist an entire directory - This option appears if you right-click a folder. It will whitelist all files in the folder and any sub folders.
Whitelist all file paths
You can select Whitelist all file paths to whitelist and clear all of the files detected. You should not do this unless you have reviewed the files and know they are safe. A confirmation dialog will appear to advise that the backup jobs will be unblocked.
Dismiss warning and Unblock Jobs
Unblock jobs is an option if you have a red banner and the jobs have been blocked. Dismiss warning is an option if you have a yellow banner and are therefore in the grace period. Selecting either of these options hides the banner and unblocks any blocked jobs. However, the alert may occur again next time a job runs if no action has been taken on the detected files.
Warning: Do not click Unblock jobs unless you have either whitelisted, deleted or restored each listed file. If you use Unblock jobs without taking these actions, all jobs may be blocked again next time a job runs.
Delete files
You cannot delete files using the CryptoSafeGuard UI, but you can access a file by right-clicking it and selecting Open folder. This will open the folder in Windows explorer.
Note: When deleting whitelisted files, hold down shift so the files do not go to the recycle bin, or empty the recycle bin after deleting the files. Whitelisted files in the recycle bin may still trigger a CryptoSafeGuard warning.
When all files have been cleared from the CryptoSafeGuard UI, a dialog will confirm that your backup jobs will be unblocked.
Infection detection with no whitelist option
CryptoSafeGuard may generate a possible ransomware alert and display the banner without detecting an infection in the files you are backing up. This could happen if CryptoSafeGuard detects certain patterns of behavior consistent with a ransomware infection. If this happens, clicking the alert banner will open the following dialog.
There are no files to whitelist or delete so you must check your system for signs of an infection.
You can do this in the following ways:
- Check if the desktop background has changed as ransomware will often remove the desktop wallpaper.
- Check all open windows and the desktop for any ransomware notification dialogs.
- Check a sample of the image files (png, jpg etc) and documents (doc, docx, xls etc) on your local drives to check they can still be opened.
Select Yes or No, based on whether you found a ransomware infection or not. Selecting No will unblock your jobs without the need to remove or whitelist files. Selecting Yes will block all jobs, so the backup are not infected by the ransomware found on your system.
To learn more about responding to a CryptoSafeGuard Alert, see your Blog article.
Managing the whitelist
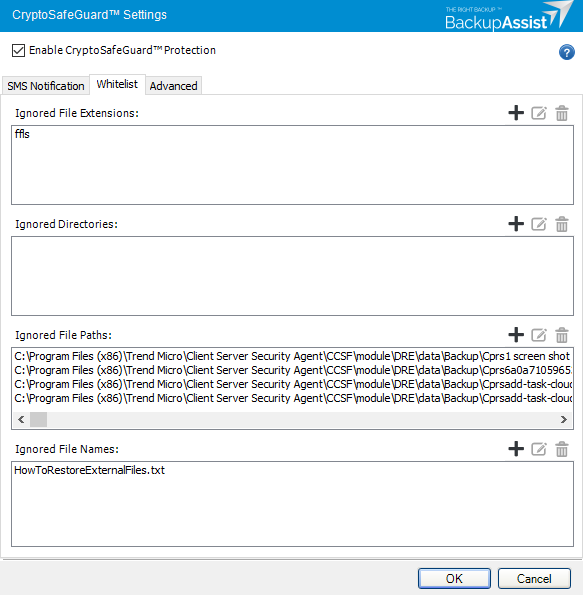
If you respond to a CryptoSafeGuard alert by whitelisting files, you can review and change your whitelist using the Manage CryptoSafeGuard Whitelist tab. You can also use this tab to add to your whitelist without an alert, but it is recommended that you use the alert list to inform your whitelisting decisions.
How to access the Manage Whitelist fields
Follow these steps:
- Select BackupAssist’s Safeguard tab.
- Select Manage CryptoSafeGuard.
- Select the Whitelist tab
To learn how to edit the Whitelist, see CryptoSafeGuard Shield
Note: Adding files and folders to the whitelist means they are excluded from CryptoSafeGuard’s scan when a backup job starts. It is important to only whitelist files that create, or are expected to create, false-positive responses when the scan runs.
Running a manual scan
The Run Ransomware Scan feature allows you to scan a system on demand for potential ransomware, and to whitelist any files that cause a false-positive response. This is useful when you first enable CryptoSafeGuard or run a new backup job because any false-positive detections can be actioned before they block your backup jobs from running.
To run a manual scan:
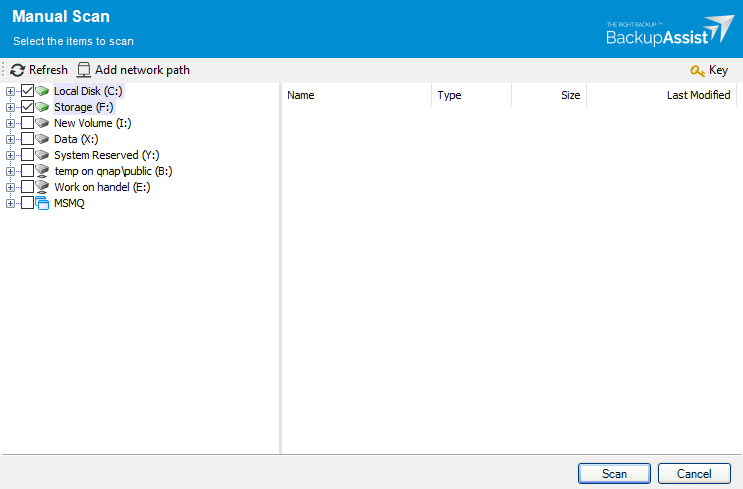
- Select the BackupAssist Safeguard tab.
- Select Scan Now.
- Select the drives and directories that you want to scan.
- Click Scan.
You should select all of the drives and directories that you plan to back up.
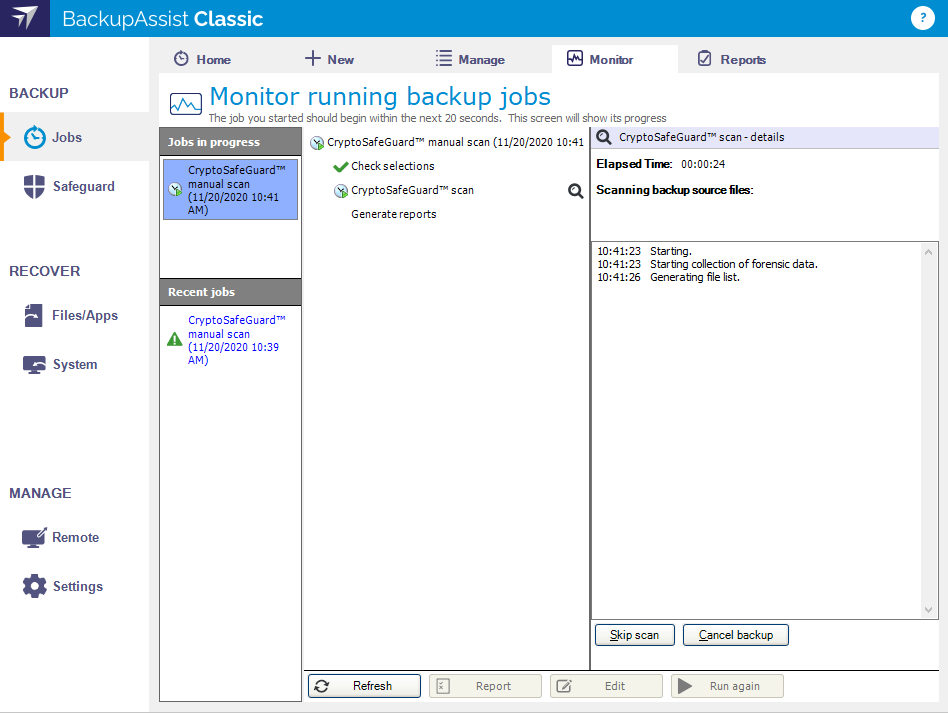
The scan will start and open the Monitor screen so you can see the scan's progress.
Note: During the grace period, you will only get warnings for flagged files. After 3 clean scans in a row the grace period will end, and any false positives or live detections will result in all backup jobs being blocked. If the backup selections are changed, the grace period will restart.
Hyper-V and SQL limitations
CryptoSafeGuard scans Hyper-V guests on Windows Server 2012 and later hosts that use locally supported file systems and basic partitioned volumes.
Note: SQL Protection jobs do not currently run with CryptoSafeGuard detection.
Hyper-V Server
When BackupAssist is installed on a Hyper-V host to back up the guests (VMs), CryptoSafeGuard will scan the guests’ contents before backing them up. However, only basic partitioned volumes are scanned. Dynamic partitioned volumes (e.g. striping, spanning) are not scanned.
On Windows Server 2008 and Windows Server 2008 R2 systems, Hyper-V guests are not scanned during CryptoSafeGuard detection (since BackupAssist 10.1.3). Guest scanning relies on timely creation and cleanup of Hyper-V checkpoints and their corresponding avhd files, and this cannot be guaranteed on these older operating systems.
Only locally supported file systems are supported when scanning guests. This means that Linux file systems like ext3 are not scanned inside guests unless there is a driver supporting that file system on the host.
