BackupAssist Legacy System Protection backs up your data to an image file backup that can be used to perform a system recovery. If you have BackupAssist v12 or later, see the new Advanced System Protection guide.
Legacy System Protection creates a full backup when it first runs. If the data selection and destination do not change, subsequent backups will be incremental. To create the incremental backups, the backup job scans all of the data to be backed up, all the data in the latest backup, and determines what has changed. Legacy System Protection will then update the current backup. New files are added, changes to files are updated and previous versions of changed files are maintained to enable multiple restore points.
You would expect an incremental backup to be faster than a full backup, but working out what data has changed takes time and can make an incremental image backup take longer than a full backup. So you are saving disk space, but not a lot of time.
Fast incremental backups
Legacy System Protection has a default setting called Enable image tracking, that allows it to record date changes using a virtual snapshot. This provides a log of the data changes so that when Legacy System Protection performs an incremental image backup, it only needs to look at the log of changes to determine what data needs to be backed up. How much faster your backups run depends on the data, destination and hardware. We’ve found that a 20 minute backup can be cut down to 2 minutes, and longer backups that take 8 hours can be completed in just 2 hours.
To learn more about the Enable image tracking setting, see Windows settings
To learn more about how Legacy System Protection uses VSS, see VSS guide
If you create a Legacy System Protection bare-metal backup on an external USB hard disk, the media will be made into a Bootable Backup Media, which can boot a server into a recovery environment and recover the server, without a separate boot disk. When you create the backup job, the media will be made bootable by default, unless you deselect the Make media bootable with RecoverAssist tick box on the Set up destination step.
Creating a Bootable Backup Media job
- Selecting Prepare on the Prepare media step will generate a Destination Check Report. This report will advise if the backup media cannot be made bootable.
- As long as the media is an external USB hard disk, it will be made bootable the first time the backup job runs. This can make the first backup take longer than a normal backup.
- After you run the backup job, the backup report’s Recovery section will note if the backup media was made bootable or if the boot information was updated.
- If there are problems making the media bootable, you can use the System tab to manually make the backup media bootable, or make a separate, standalone RecoverAssist media.
Considerations:
- If a newer version of RecoverAssist is released, it will be applied to the media.
- If a bootable media is created using a trial version of BackupAssist, it will be updated if a license key is purchased.
- If the operating system being backed up changes, the bootable media will be updated to support it.
- Bootable backups will speed up your disaster recovery process
Data containers are VHD/VHDX files that Legacy System Protection backups can use as a backup destination on a physical backup media. Data containers are mounted and seen as a local drive on Windows, meaning that NAS and RDX media can support VSS, and therefore incremental image backups. Data containers also enable portable image backups because all backups can be restore from, even if the backup is copied to another device.
To learn more about Data containers, see Data Container guide
The backup destination must support image backups, and the choice will determine if you can have multiple restore points.
Destination support for image backups
Destination media : Legacy System Protection bare-metal backups can be used to perform a disaster recovery. The media containing the bare-metal backup will need to be accessed by the recovery environment. This should be considered when deciding on the type of backup destination to use.
Destination’s format : Local drives, external drives and iSCSI targets (destinations) must be formatted with NTFS or ReFS to support VSS snapshots. Legacy System Protection cannot incrementally back up data from a ReFS formatted drive (source). This means a full backup of all selections will take place each time the backup job runs.
Destination’s sector size : The version of Windows affects the disk sector size supported by your image backups. Windows Server 2008/R2 requires 512 byte sector disks. Windows Server 2012 and later can use 512 bytes or 4k sector size disks. This consideration is important for large capacity devices as vendors often set the sector size to 4k, because it provides better density and reliability. Check the sector size of your storage device, and if the vendor has tools that allow the device to support 512 bytes.
Destination’s capacity : When a backup uses VSS snapshots to support multiple restore points, the storage required will grow as data changes. Therefore, the backup destination's capacity should be at least 2.5 times larger than the amount of data being backed up. If there is other data on the drive, the free space needs to be at least 2.5 times larger than the data being backed up. This allows room for the snapshot to maintain copies of data that has changed. As space runs out, the oldest copies (restore points) are deleted.
Destination’s shadow copy storage : The space on the disk used by the VSS snapshot to store data that has changed is called the volume shadow copy storage. In the same way that you need to ensure that you have enough space on the backup destination, you must also consider the amount of disk space specifically allocated to the shadow copy storage. When this space reaches its limit, it will delete the oldest data to make room for new data. If the amount of space reserved is too low or at 100%, then problems can occur. You should set the disk space allocated to your shadow copy storage to a size that allows for it to grow as data changes and is added.
To learn more about Shadow copy storage, see our Image backup destination article
Destinations support for multiple restore points
Each incremental backups overwrites the data that changed, so you can only restore data from the previous backup. Legacy System Protection overcomes this limitation by using VSS snapshots, which are stored on the backup destination to maintain copies of the data that is overwritten each time a backup job runs. When a restore is performed, the backup and these snapshots are used to provide a restore point for each backup job. To maintain these restore points, the destination must support VSS snapshots. To do that, the destination must be seen as a local device by the computer that you are backing up. The destinations listed below support VSS snapshots and therefore multiple restore points.
- Local hard drives
- iSCSI targets that can appear to your computer as a local (not mapped) drives
- External disks that are directly attached. They can be removed as part of your media rotation, as long as they are presented as a local drive when they are attached.
- Data containers. Mounted as a local Windows drive, allowing RDX and network locations to maintain multiple restore points.
How to create a Legacy System Protection backup job
Launch BackupAssist and follow the steps outlined below:
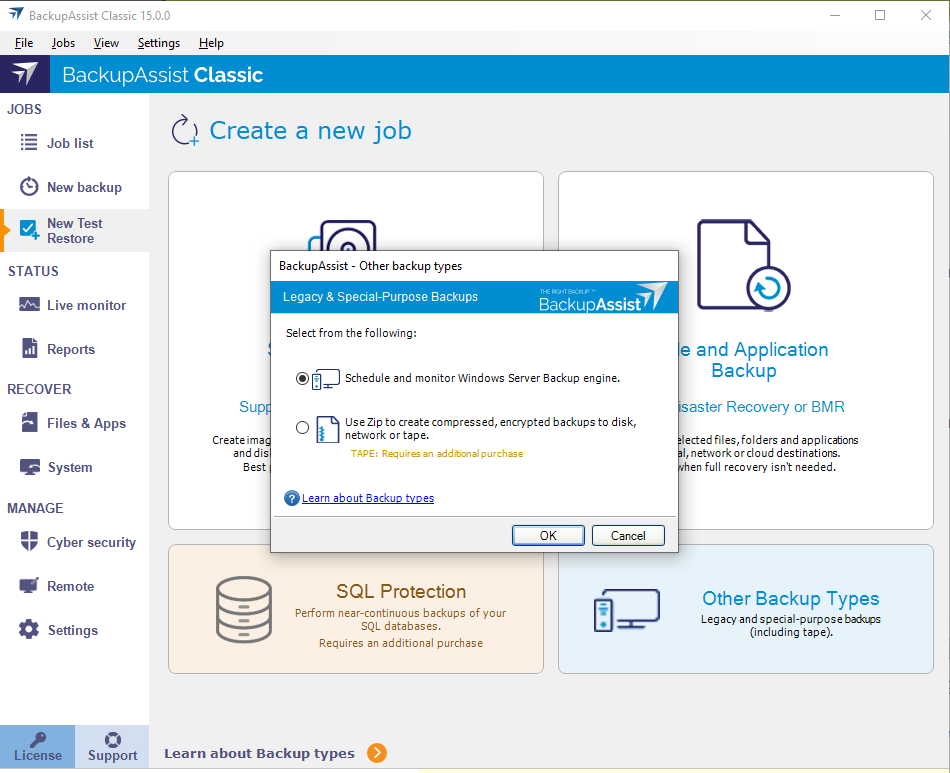
- Select the New backup tab under the JOBS menu.
- Select Other Backup Types.
- Select the Legacy System Protection engine.
- Selections
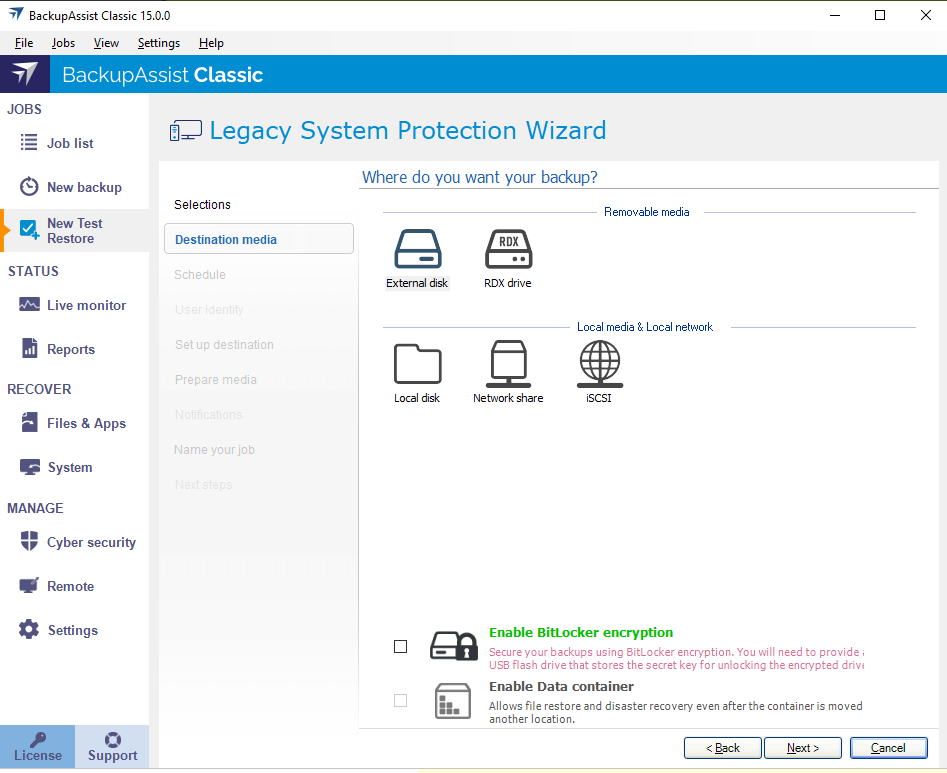
- Destination media.
This step is used to select the type of media that you want to back your data up to. This step’s name will change to the media type selected, when you click Next. - Select a media for your backup destination.
- Select Enable BitLocker encryption if you want to encrypt your backup. BitLocker encryption is available on supported versions of Windows Server that have BitLocker installed for External disk and RDX drive destinations. To learn more, see BitLocker Encryption guide
- Select Data container, if you want to use a VHD / VHDX as your backup destination. Read our Data Container guide guide to understand when to use a Data container, and what the advantages and requirements are.
- Click Next.
- Schedule
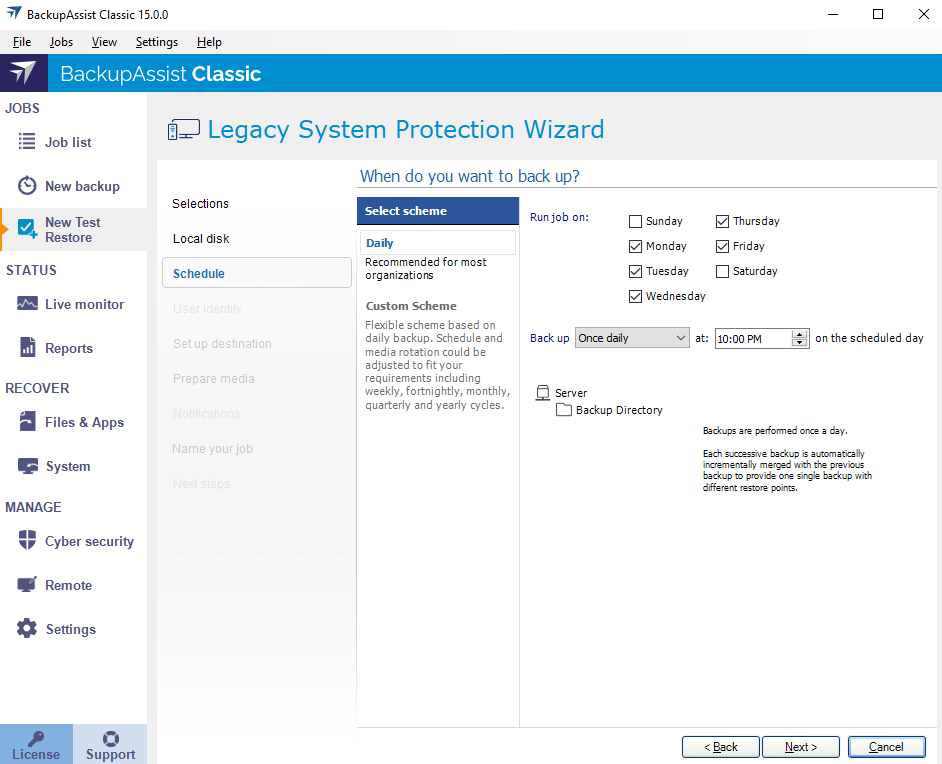
This step is used to select when (days and times of the week) and how you want the backup job to run, and how long you would like the backup to be retained for. A selection of pre-configured schedules, called schemes, as well as a custom scheme, can be selected. - The schemes available will depend on the type of destination media selected in step 5.
- Clicking on a scheme will display information about the schedule used.
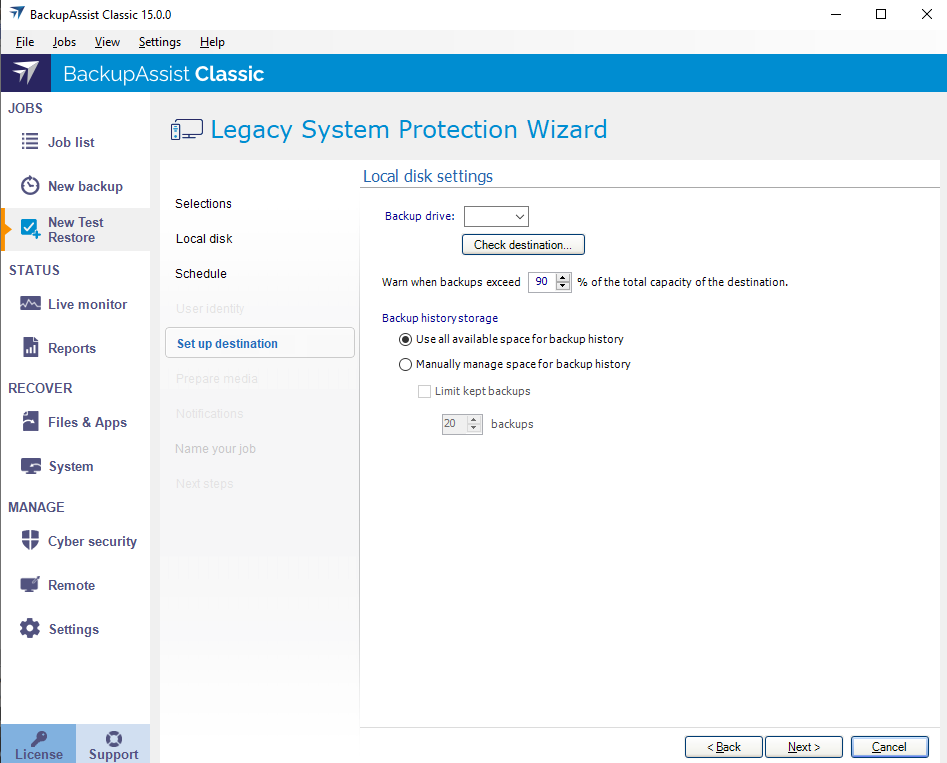
- Set up destination.
This step is used to configure the location of the media selected in step 5. The options presented will change with the type of media selected. - A drive letter of the USB drive used to store the encryption key. An encryption key is saved for each encrypted drive, and is used to unlock the drive when you backup and restore data.
- A password that will allow you to manually access any drive encrypted by this job when you perform a restore or a recovery. This password is saved in the backup job.
- For an RDX or External disk destination, Use all available space will be selected by default. It is important to review this setting to ensure it is appropriate.
- For a Local hard drive and Network location, set the size manually by using the field provided, or select the Use all available space option.
- The size of a Data container cannot be changed once the backup job has run.
- Selecting Use all available space will allow the Data container to grow into the available space.
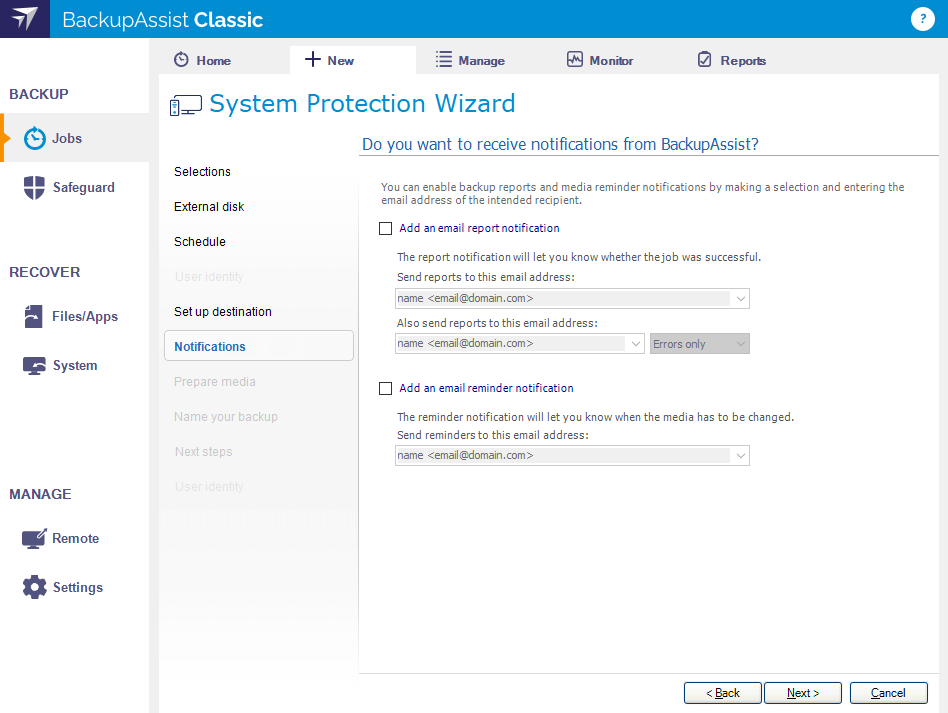
- Notifications
Once a backup job has completed, BackupAssist can send an email to inform selected recipients of the result. This email notification is enabled during the creation of the backup job, but you must also provide your mail server settings so that the notifications can be sent. To learn how to configure your mail server for BackupAssist, see Email server settings. Show more
To enable email notifications:
- Select Add an email report notification.
- Enter recipients into the Send reports to this email address field.
- Enter recipients into the Also send reports to this email address field. You can then use the drop down list to select the condition under which the email is sent.
- If you want to know when a backup media has been changed, select Add an email reminder notification and enter the email addresses to send the notifications to.
- Click Next.
To learn more, see Edit Job : Notifications
Note: After the backup job has been created, you can modify the notification's recipients, set additional notification conditions and include print and file notification types. To learn more, see Email address list
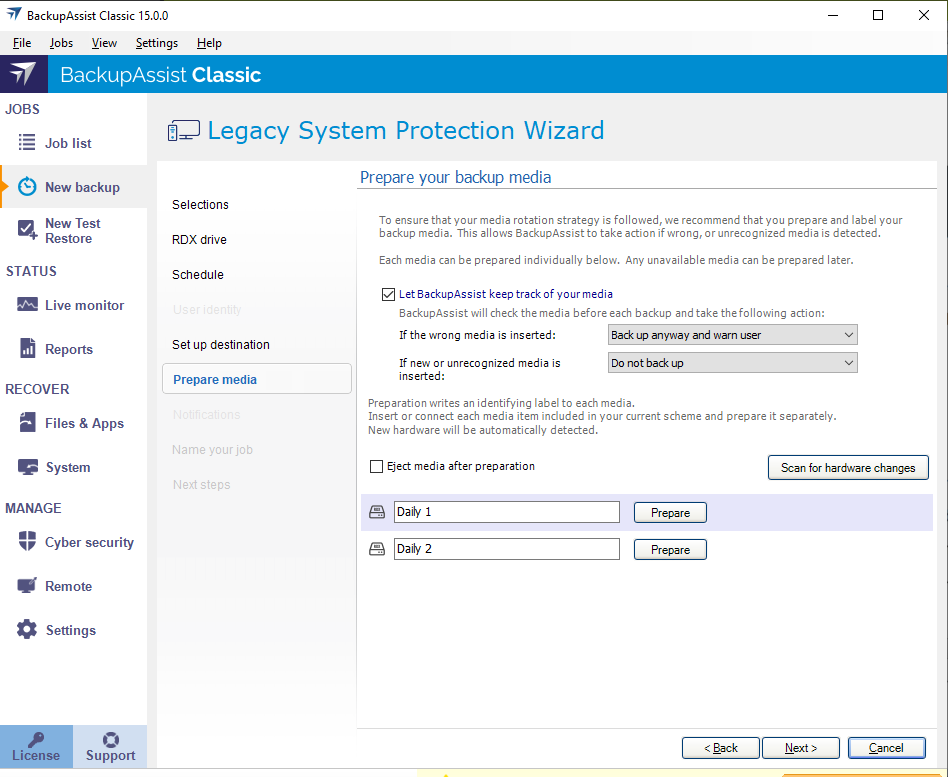
- Prepare media
If you selected BitLocker, this step will allow you to prepare the Media for BitLocker and label it. If you are not using BitLocker, but are using external drives, we recommend Editing the backup job once you have created it and using the Prepare Media option to label each drive. - Let BackupAssist keep track of your media. Deselect this if you do not want to prepare and label your media.
- If the wrong media is inserted : Back up anyway and warn the users. This can be changed to Do not back up.
- If new or unrecognized media is inserted : Do not back up. This can be changed to Back up anyway and warn the users.
- Attach the removable drives. If you can only attach one media at a time, repeat the steps for each media.
- Change the label's description if you do not want to use the default description.
- Select the drive designation.
- Select Prepare.
- Name your backup.
Provide a name for your backup job, and click Finish.
If you are using BitLocker encryption, the option will be Next. - Next steps.
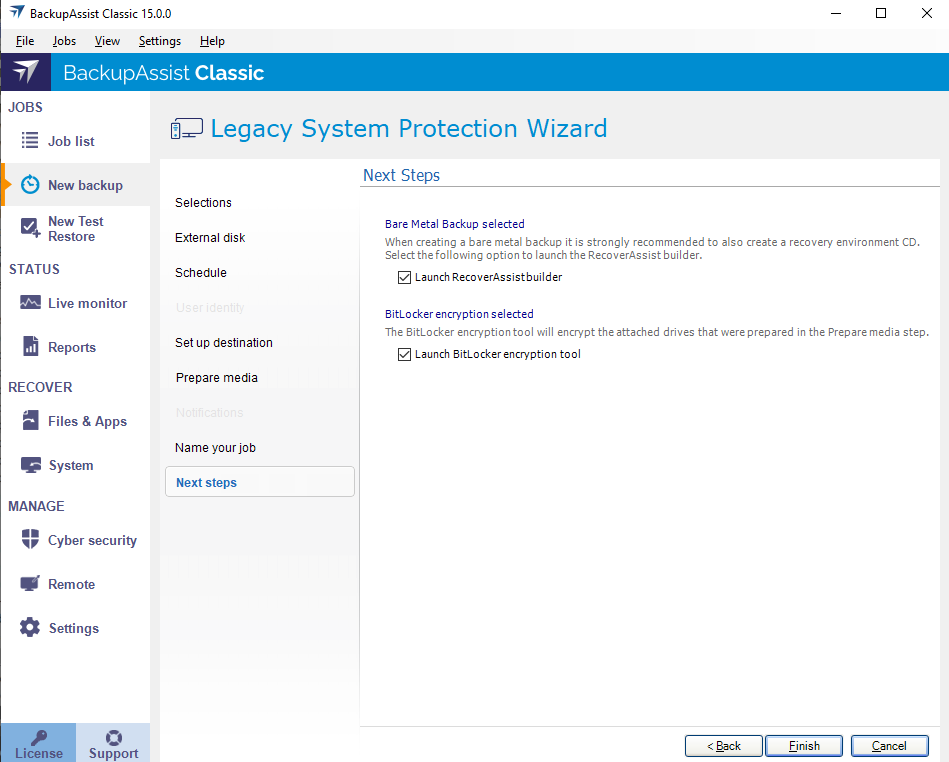
This step will be available if you selected Enable BitLocker encryption, so you can encrypt the removable drives. This step will also be available if you are making a backup of the entire system, so that you can make a bootable media.
If this is the first time you have created a backup job, you will be asked to provide a Backup user identity
This step is used to select the data and applications that you want to back up. Any VSS applications detected will be displayed here as application directory containers.
There are two selections to choose from:
Back up the Entire System.
This option will create an image of your system that can be used to perform a full recovery of your computer. Critical Volumes is selected by default and required for a bare-metal backup. A bare-metal backup can be used to recover your computer, after hardware has been replaced or an operating system failure has occurred and your computer can no longer start itself.
Back up selected items only.
This option is used if you only want to create a backup of files, folders and applications. The option will allow you to deselect Critical Volume’s and select specific VSS applications and drives. You can select specific data within a drive (e.g. C:) if BackupAssist is on Windows Server and the destination is a removable disk. To do this, modify the backup job after you save it using the Manage menu on the Jobs tab.
Critical Volumes.
This part of the Selections screen displays the drive that Windows is installed on. Critical Volumes must be selected if you want to be able to use the backup for a bare-metal recovery.
Full VSS mode and Copy VSS mode.
Full VSS mode is selected by default and means that VSS will clean up log files in the guest after the backup has been created. For example, the logs of an Exchange Server. If Copy VSS mode is selected, VSS will not perform a post backup cleanup and the size of logs will continue to grow and take up disk space.
Make your selections, and click Next.
Follow these steps to select a media:
Schedule considerations:
Back up frequency.
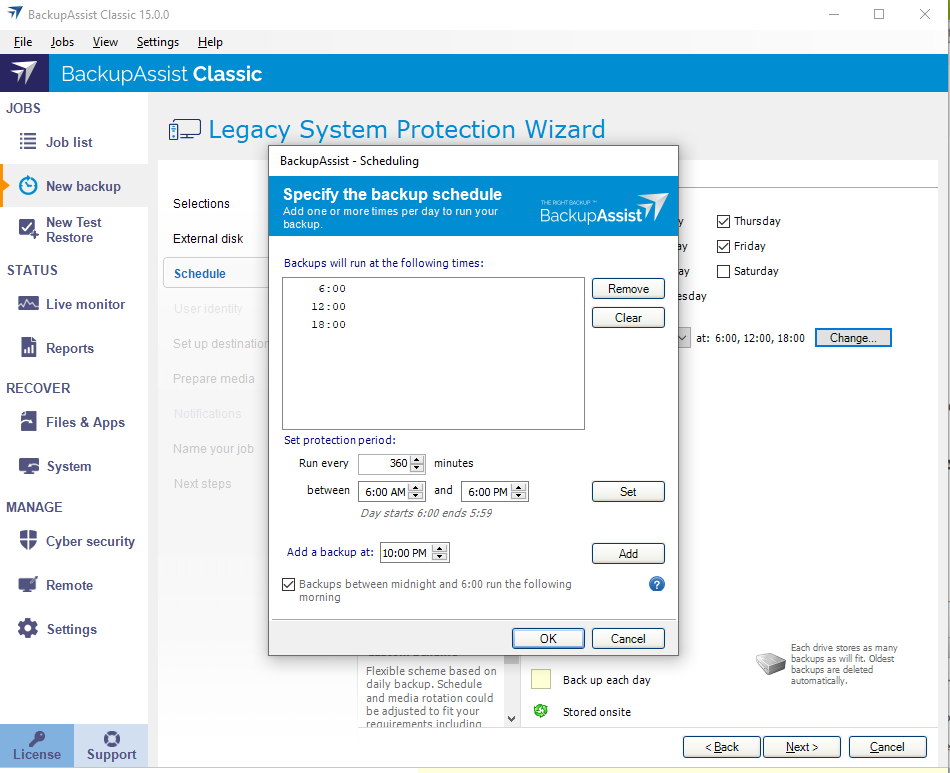
Legacy System Protection backups can be run more than once per day by selecting Multiple times daily from the Back up drop down. Select the Change button to set the schedule and review the reporting requirements.
The default run times of 6:00, 12:00 and 18:00 can be removed and replaced with new start times using the Add a backup at option.
To learn more, see Backup Schedules
Select an appropriate scheme, and click Next.
BitLocker encryption setup
If you selected BitLocker encryption in step 5, you will need to provide:
Note: A USB flash drive containing the encryption key must connected to the server running BackupAssist, to allow BackupAssist to access the drive when you backup or restore data.
Note: It is important that you keep a copy of your password in a safe place, as we cannot retrieve passwords if they are lost or forgotten.
Data container setup
If you selected Data Container in step 5, you will need to configure the Data container.
Bootable Backup setup
If you are doing a bare-metal backup to an external hard disk, a Bootable Backup Media option will be displayed and selected by default. This feature allows your backup media to boot into a RecoverAssist recovery environment and recover the server, without a separate boot disk.
Destination check report
If you are using a Local media or a Local network destination, a Check destinationbutton will be available to check your backup destination for problems. After the checks have been completed, the results can be viewed by selecting the Report link. If you are using Removable media destinations, these checks are performed when you select Prepare on the Prepare Media step.
Configure your backup destination, and click Next.
When BitLocker is enabled, these three selections are automatically selected on the Prepare media screen:
The drives listed are based on the backup schedule selected in step 6. Each drive will have a default label name based on your backup schedule, a drive designation drop-down and a Prepare button that is selectable when the media is attached.
To prepare the media:
The drives will be labeled and marked for encryption. Labeling the drive allows BackupAssist to check that it is being used on the correct day. For example, if you attach a USB drive on Tuesday but it is labeled Wednesday, BackupAssist will warn that the incorrect drive was detected. The encryption process will be initiated by the final backup job creation step. To learn more, see BitLocker Encryption guide.
Destination check report
Once the prepare process has completed, a Report link will appear next to the Prepare button. This link opens the Destination Check report, which will advise if any problems were detected with the backup media. For System Protection backups, if the Make media bootable with RecoverAssist was selected in the Set up destination screen, the report will also advise if the media can or cannot be made bootable.
Once all of the media have been prepared, select Next.
Launch RecoverAssist builder
If this box is ticket, the RecoverAssist builder will open when you select Finish. The RecoverAssist builder will allow you to make a standalone bootable media or a bootable backup media to use in a disaster recovery. Attach the media and select the option required. You do not need to use this process to make a bootable backup; a backup will automatically be made bootable the first time the backup job runs if you left Bootable Backup Media selected in the Set up destination step.
To learn more about RecoverAssist, see Recover System tab
Launch BitLocker encryption tool
If this box is ticked, the BitLocker Encryption tool will open when you select Finish. When the tool opens, you can use it to encrypt the drives. This should be done before the backup job runs, because if an unencrypted drive is used for a BitLocker backup job, the job will fail. The BitLocker encryption tool can run in the background after BackupAssist has been closed.
To learn about the BitLocker encryption tool and how to use it, see BitLocker Encryption guide.
Your Legacy System Protection backup job has now been created.
Note: BackupAssist's reports can be used to review the results of each backup job. Backups should also so be checked by performing a test restore. Regular test restores should be part of your backup solution.
What's next
- To learn about monitoring backup jobs, see Monitor backups
- To learn about the other backup settings available, see Settings tab
- To learn about the options available when you edit a backup job, see Jobs list

